Building Ramble #3: Visualizing the Waveform
How we render a smooth, real-time audio waveform with Canvas in the browser
- Building Ramble #1: Taming the Microphone
- Building Ramble #2: Capturing Audio in Real-Time
- Building Ramble #3: Visualizing the Waveform
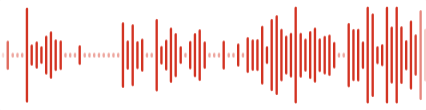
When recording audio in Ramble , users see a waveform: a row of vertical bars that slide across the screen, reacting to their voice in real time. This component started as a simple prototype with bars that animated randomly, just to signal that “something is happening.” The goal was to evolve it into something that actually responds to the user’s voice, with bars that reflect real audio amplitude and scroll smoothly from right to left.
This write-up covers the interesting technical challenges involved: rendering efficiently with Canvas, processing live audio to extract meaningful loudness values, and making the animation feel smooth across different devices and edge cases.
Rendering with Canvas
For an animation that updates dozens of times per second, Canvas was the natural choice over DOM elements. A single <canvas> element gives us direct control over every pixel, and we redraw the entire waveform on each frame without the overhead of React reconciliation or browser layout recalculations.
Scaling for Sharp Displays
One early issue: the waveform looked blurry on Retina and other HiDPI displays. Not great. 😬 By default, a canvas sized at 200×40 pixels renders exactly that, 200×40 physical pixels. On a Retina display with a 2x pixel density, the browser stretches those pixels to fill the space, resulting in a fuzzy image.
The fix involves separating the canvas’s CSS size from its actual backing store resolution. We keep the CSS dimensions at the intended size, but multiply the internal resolution by devicePixelRatio. Then we scale the drawing context so all our coordinates can stay in CSS units:
canvas.style.width = `${width}px`
canvas.style.height = `${height}px`
canvas.width = Math.floor(width * devicePixelRatio)
canvas.height = Math.floor(height * devicePixelRatio)
context.setTransform(devicePixelRatio, 0, 0, devicePixelRatio, 0, 0)
The result is crisp, sharp bars on any display. We also listen for changes: when a user drags the window from a Retina laptop screen to an external monitor (or vice versa), the pixel ratio changes and the canvas re-scales accordingly.
Frame-Rate Independent Drawing
Monitors run at different refresh rates: 60Hz, 120Hz, 144Hz, and beyond. If we simply moved the waveform by a fixed number of pixels on every frame, it would scroll twice as fast on a 120Hz display compared to a 60Hz one.
The solution is time-based animation. On each frame, we calculate how many milliseconds have passed since the last frame (deltaTime) and multiply that by a scroll velocity expressed in pixels per millisecond:
const scrollRate = sampleWidthWithGap / sampleIntervalMs
scrollOffset += scrollRate * deltaTime
This way, the waveform moves at a consistent visual speed regardless of how often the screen refreshes. A user on a 144Hz gaming monitor sees the same animation speed as someone on a standard 60Hz display.
Audio-Reactive Visualization
Reading the Audio Signal
To make the waveform respond to actual voice input, we use the Web Audio API’s AnalyserNode. This gives us access to the raw audio signal from the microphone, an array of values representing the waveform at a given moment.
But raw audio data is noisy and fluctuates rapidly. We need a single, stable value that represents “how loud is the audio right now?” This is where RMS (Root Mean Square) comes in. Instead of taking the peak value (which can spike erratically), RMS squares all the sample values, averages them, and takes the square root:
analyserNode.getByteTimeDomainData(audioDataBuffer)

for (let i = 0; i < bufferLength; i++) {
    const amplitude = (audioDataBuffer[i] - 128) / 128
    sum += amplitude * amplitude
}
return Math.sqrt(sum / bufferLength)
The 128 here is the key: getByteTimeDomainData() returns 8-bit unsigned integers (0-255), where 128 represents silence (the midpoint). Subtracting 128 centers the waveform around zero, and dividing by 128 normalizes it to the -1 to +1 amplitude range. Squaring each value makes them all positive, and after averaging and taking the square root, we get an RMS value between 0 and 1. The result is a smoother, more perceptually meaningful measure of loudness, one that translates well to bar heights without flickering all over the place. 😅
From Loudness to Bar Height
Once we have an RMS amplitude (a value between 0 and 1), we map it to a pixel height within the bounds defined by the design spec:
const normalizedAmplitude = Math.min(amplitude / amplitudeSensitivity, 1)
return sampleMinHeight + normalizedAmplitude * (sampleMaxHeight - sampleMinHeight)
This linear interpolation gives us a height between sampleMinHeight for quiet sounds and sampleMaxHeight for loud ones.
Two additional parameters help fine-tune the feel. A detectionThreshold filters out low-level background noise; below this threshold, we treat the audio as silence and render a minimal bar in a muted color. The amplitudeSensitivity value controls how reactive the waveform feels. Lower sensitivity means quiet sounds still produce noticeable bars, while higher sensitivity requires louder input to reach maximum height.
The Scrolling Effect
The first working version had bars that reacted to audio amplitude, but they stayed fixed in position. Close, but not quite. 🤏 The next step was making them scroll: new bars appearing on the right, older ones disappearing off the left.
This is driven by an accumulating scroll offset. On every frame, we add to this offset based on deltaTime and scroll velocity. When the offset exceeds the width of one bar (plus gap), we sample the current audio amplitude, create a new bar at that height, and subtract one bar-width from the offset, keeping any fractional remainder for sub-pixel precision. Using a while loop instead of if ensures we can catch up gracefully if a frame is slow and multiple samples need to be added at once.
Each bar’s horizontal position is calculated by subtracting the scroll offset:
const x = Math.round(
    width - sampleWidth - i * sampleWidthWithGap - sampleScrollOffsetRef.current
)
The Math.round() prevents sub-pixel positioning that could make bars look blurry. To store the waveform history efficiently, we use a circular buffer: a fixed-size array where new samples overwrite the oldest ones, avoiding the performance cost of constantly shifting array elements.
One tricky edge case 🫠: when the browser tab is hidden, requestAnimationFrame pauses, but audio may continue recording in the background. When the tab regains focus, the first frame could have a massive deltaTime, causing a burst of samples to be added all at once and a jarring visual jump. To handle this, we cap deltaTime to a reasonable maximum (100ms). The waveform resumes smoothly rather than trying to “catch up” all at once.
Fully Configurable
The component accepts a WaveformConfig object that controls both behavior and appearance, making it reusable for different use cases:
Behavior:
-
detectionThreshold– minimum audio level to register as sound (filters background noise) -
amplitudeSensitivity– how sensitive the bars are to volume (lower = more reactive to quiet sounds) -
sampleIntervalMs– how often to sample audio and how fast the waveform scrolls
Appearance:
-
sampleWidth– width of each bar in pixels -
sampleMinHeight/sampleMaxHeight– height bounds for the bars -
sampleGap– spacing between bars
All of this can be tweaked without touching the component internals. Want to see it in action? There’s a Storybook story where you can experiment with different configurations using your own microphone.
Wrapping Up
Canvas rendering, audio processing, and smooth scrolling are three different challenges, but they all needed to work together for the waveform to feel right. The scrolling was the piece that took the longest. I tried it early on and couldn’t crack it. Tried again later, same result. 🙃 It wasn’t until I had dedicated time to focus on it properly that things clicked. 💡 And it was worth the effort because users notice when something feels polished, even if they can’t articulate why.
The component now handles all of this—HiDPI scaling, frame-rate independence, smooth scrolling—out of the box. And since it’s fully configurable, it’s ready for any use case that needs a waveform.